
Based off of a Bernat pattern I found, this wrap makes the perfect fall cover-up for a coordinating dress. You can choose, like I did, to use a contrasting color for the collar and trim, or you can go with a solid like the original, human version. Either way, it’s a very simple piece with minimal finishing (if you hate sewing tiny seams as much as I do, you’ll love that there are none) and a lovely yarn over increase detail. The unmodified pattern will fill Pullip and Blythe; I think it will fit a Barbie if you go up a needle size.
Classy Collared Capelet for Pullip
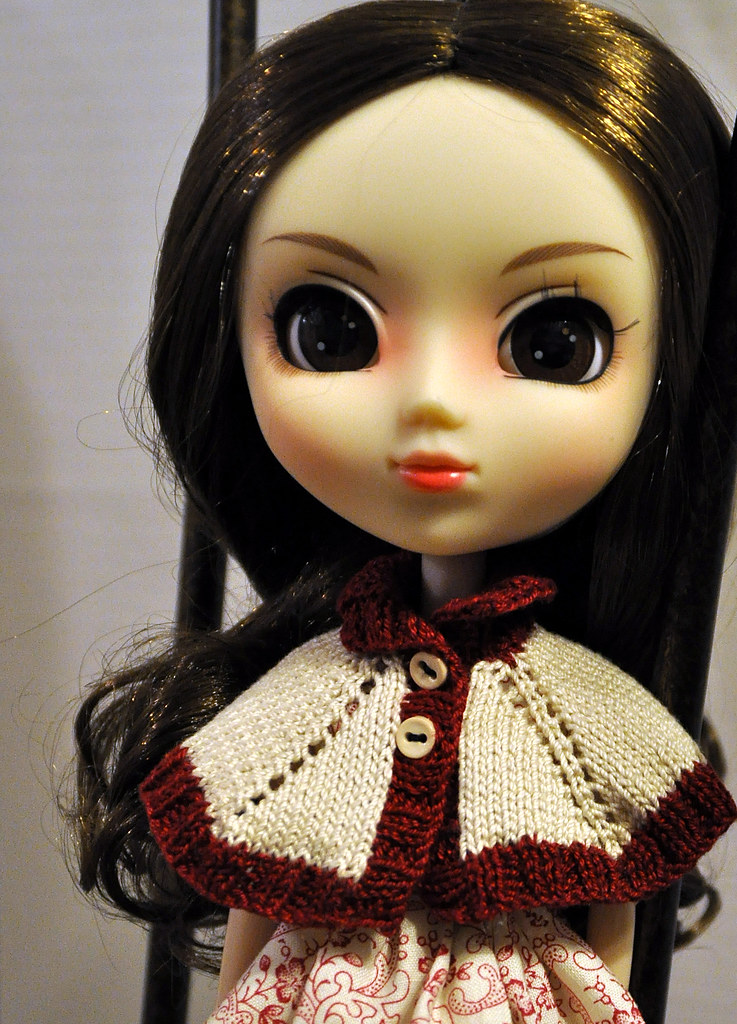
Materials:
- Size 1-US needles (for knitting flat)
- One ball MC (you will need far less than a full ball) of size 10 crochet cotton
- Used for example: Aunt Lydia’s Classic Crochet Cotton (100% mercerized cotton, 350 yd/ball) in 419 Ecru (MC) and 492 Burgundy (CC)
- Four stitch markers
- Two small buttons (I used ¼” buttons)
- Scissors & darning needle
You will need to know:
- How to knit and purl (and how to combine them into K2 P2 rib)
- How to yo
- How to pick up stitches along a cast-on edge and a side edge
- The m1p increase
- How to bind off in rib
Gauge: 11 sts/per inch in stockinette stitch on size 1-US needles. To ensure accurate sizing, be sure to check your gauge.
Capelet:
With MC, CO 28 sts. P1 row.
Capelet:
With MC, CO 28 sts. P1 row.
SETUP ROW: k2, yo, PM, k1, yo, k5, yo, PM, k1, yo, k10, yo, PM, k1, yo, k5, yo, PM, k1, yo, k2. P the next row.
Work this row until you have 108 stitches (10 repeats):
*K to marker, yo, slip marker, k1, yo, rep from * to last marker, yo, k to end. P all WS rows.
When you have 108 stitches on the needle (or if you are changing the length of the capelet, when it has reached the length you want), change to CC and k 1 row.
Next row (WS): P3, (k2, p2) to last st, p1.
Next row (RS): k3, (p2, k2) to last st, k1.
Repeat these two rows one more time for a total of 4 rows of ribbing in CC.
Next row (RS): k3, (p2, k2) to last st, k1.
Repeat these two rows one more time for a total of 4 rows of ribbing in CC.
Collar:
With RS facing, pick up and knit one stitch for every CO stitch, for a total of 28 sts on the needles.
Increase row: (p4, m1p) to last 4 sts, p4.
Increase row: (p4, m1p) to last 4 sts, p4.
Work in k2, p2 rib for about ¾ of an inch or so, or until the collar is the length you want it to be. I wanted mine to stop at the shoulder joint, so I worked 11 rows. It does not matter if you end on a RS or WS row, as long as it looks right to you. BO loosely in rib.
Button Bands:
Note: if you changed the length of your capelet or collar, you will need to adjust these numbers as well. Just pick up 3 stitches to every 4 rows and try to finagle it into being a multiple of 2.
LEFT FRONT: with RS facing, pick up and knit 32 stitches along the left front edge. Work 4 rows in 2x2 rib and BO loosely. Mark where you want the two buttons to be (no need to get fancy here).
RIGHT FRONT: with RS facing, pick up and knit 32 stitches along the right front edge. Work 1 row of 2x2 rib. Work a row of 2x2 rib and when you come to the buttons, yo, k2tog to make buttonholes, working the rest of the row in pattern. Work 2 more rows of 2x2 ribbing and BO loosely.
Weave in all ends, block, and attach buttons where marked.

No comments:
Post a Comment