Showing posts with label blythe. Show all posts

Saturday, October 29, 2011

Knitting Pattern: Classy Collared Capelet for Pullip & Blythe


Based off of a Bernat pattern I found, this wrap makes the perfect fall cover-up for a coordinating dress.  You can choose, like I did, to use a contrasting color for the collar and trim, or you can go with a solid like the original, human version.  Either way, it’s a very simple piece with minimal finishing (if you hate sewing tiny seams as much as I do, you’ll love that there are none) and a lovely yarn over increase detail.  The unmodified pattern will fill Pullip and Blythe; I think it will fit a Barbie if you go up a needle size.


Classy Collared Capelet for Pullip


Materials:
  • Size 1-US needles (for knitting flat)
  • One ball MC (you will need far less than a full ball) of size 10 crochet cotton
    • Used for example: Aunt Lydia’s Classic Crochet Cotton (100% mercerized cotton, 350 yd/ball) in 419 Ecru (MC) and 492 Burgundy (CC)
  • Four stitch markers
  • Two small buttons (I used ¼” buttons)
  • Scissors & darning needle
You will need to know:
  • How to knit and purl (and how to combine them into K2 P2 rib)
  • How to yo
  • How to pick up stitches along a cast-on edge and a side edge
  • The m1p increase
  • How to bind off in rib
Gauge: 11 sts/per inch in stockinette stitch on size 1-US needles.  To ensure accurate sizing, be sure to check your gauge.

Capelet:
With MC, CO 28 sts.  P1 row.
SETUP ROW: k2, yo, PM, k1, yo, k5, yo, PM, k1, yo, k10, yo, PM, k1, yo, k5, yo, PM, k1, yo, k2.  P the next row.

Work this row until you have 108 stitches (10 repeats):
*K to marker, yo, slip marker, k1, yo, rep from * to last marker, yo, k to end.  P all WS rows.

When you have 108 stitches on the needle (or if you are changing the length of the capelet, when it has reached the length you want), change to CC and k 1 row.
Next row (WS): P3, (k2, p2) to last st, p1.
Next row (RS): k3, (p2, k2) to last st, k1.
Repeat these two rows one more time for a total of 4 rows of ribbing in CC.

Collar:
With RS facing, pick up and knit one stitch for every CO stitch, for a total of 28 sts on the needles.
Increase row: (p4, m1p) to last 4 sts, p4.
Work in k2, p2 rib for about ¾ of an inch or so, or until the collar is the length you want it to be.  I wanted mine to stop at the shoulder joint, so I worked 11 rows.  It does not matter if you end on a RS or WS row, as long as it looks right to you.  BO loosely in rib.

Button Bands:
Note: if you changed the length of your capelet or collar, you will need to adjust these numbers as well.  Just pick up 3 stitches to every 4 rows and try to finagle it into being a multiple of 2.
LEFT FRONT: with RS facing, pick up and knit 32 stitches along the left front edge.  Work 4 rows in 2x2 rib and BO loosely.  Mark where you want the two buttons to be (no need to get fancy here).
RIGHT FRONT:  with RS facing, pick up and knit 32 stitches along the right front edge.  Work 1 row of 2x2 rib.  Work a row of 2x2 rib and when you come to the buttons, yo, k2tog to make buttonholes, working the rest of the row in pattern.  Work 2 more rows of 2x2 ribbing and BO loosely.
Weave in all ends, block, and attach buttons where marked.

Saturday, October 22, 2011

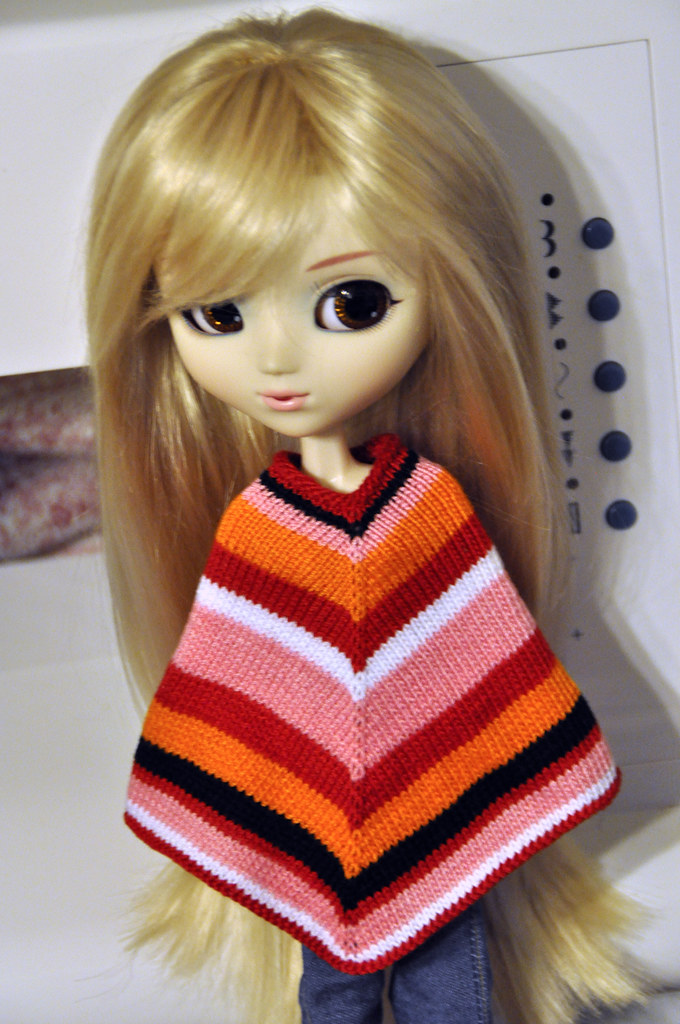
Knitting Pattern: Stitch & Bitch "That Seventies Poncho" sized for Pullips & Blythe

Inspired by “That Seventies Poncho” from Stitch ‘N Bitch Nation, by Debbie Stoller, this retrofabulous accessory will make your Fruit Punch and Pow Wow Poncho girls totally jealous!  Just a warning, though – while doll clothes are generally pretty quick to knit, by the time you get to the bottom of this one, it can be a bit exhausting (you might have around 160 stitches on the needles if you follow this pattern verbatim).  Luckily, though, it’s STILL only a doll poncho, so it goes quicker than a human version, for sure – and the results are totally worth it.  Try it in these fruity brights, or maybe greens-aquas-yellows-and-whites; or pinks-and-purples, for a super-girly look.

Pullip That Seventies Poncho


Funky color scheme optional.  Eve gave me no choice!

Materials:
  • Size 1-US needles (for knitting flat)
  • One ball (you will need far less than a full ball) of size 10 crochet cotton in your choice of colors.  Even a solid-colored poncho will not require a full ball.
    • Used for example: Aunt Lydia’s Classic Crochet Cotton (100% mercerized cotton, 350 yd/ball) in:
      • 901 Pagoda Red
      • 012 Black
      • 493 French Rose
      • 431 Pumpkin
      • 001 White
  • Small snap, hook and eye, hook and loop, or closure of your choice
  • Scissors & darning needle
You will need to know:
  • How to knit and purl
  • How to m1
Gauge: 11 sts/per inch in stockinette stitch on size 1-US needles.  To ensure accurate sizing, be sure to check your gauge.

Poncho:
CO 35 sts.  K2 rows.
Next row (RS): k1, m1, k16, m1, pm, k1, m1, k to last st, m1, k1.

P next and all subsequent WS rows.
Next and all subsequent RS rows: k1, m1, k to marker, m1, slip marker, k1, m1, k to last st, m1, k1.

Repeat as established (working increase row every RS row and p all WS rows) until you have reached the length you want for your poncho.  

The color pattern I used for my poncho, approximating the Stitch & Bitch version, is as follows:
4 rows red (including the first 2 knit rows), 2 rows black, 4 rows pink, 8 rows orange, 6 rows red, 4 rows white, 10 rows pink, 6 rows red, 6 rows orange, 4 rows black, 2 rows red, 4 rows pink, 2 rows white, 1 row red, and then BO in red.

Block.  Using mattress stitch, close back seam about ¾ of the way up.  Close the top with a hook and eye or snap.

I did not do a drawstring on my poncho.  If you wanted to, add some evenly spaced eyelets (yo, k2tog) around row 3 and weave in a length of crochet chain stitch or braided thread.  Also, in the original pattern, there are occasional rows of garter stitch; all you have to do to accomplish this is to knit the occasional WS row.

Monday, October 3, 2011

Knitting Pattern: Pullip Anthropologie-Inspired Capelet

Based on Julia Allen’s Anthropologie-inspired Capelet (Peony Knits designs), available on Ravelry.  For more information, see Julia Allen’s blog at http://peonyknits.blogspot.com.

Pullip "Anthropologie-Inspired" Capelet


A brooch used to close this made from an old earring would be a nice touch.
You will need:
  • Size 1-US needles: Two DPN’s, straights, or a circular
  • Size 10 crochet cotton
    • Used for example: Aunt Lydia’s Classic Crochet Thread (100% mercerized cotton, 350 yd/320m per ball) color 0420 Cream
  • 4 very small stitch markers (best bet: tiny jewelry jumprings, available in the jewelry section of many craft stores)
  • Stitch holders (preferably 2 large safety pins)
  • A small button or pin, or other closure for the front
  • Scissors, ruler, & darning needle
You will need to know:
  • How to knit and purl, and 1x1 rib
  • How to yo
  • How to place stitches on a holder and rejoin yarn
  • How to BO in 1x1 rib
Gauge: 11 sts/per inch in stockinette stitch on size 1-US needles.  To ensure accurate sizing, be sure to check your gauge.

Note:
You will need to have a separate ball of yarn for working the sleeves and body, or two ends from the same ball.  Since I work from a ball of crochet thread, I wind about 10 yards of thread onto a bobbin (the small Susan Bates kind, in my favorite color – purple) to hold aside for the sleeves.  Cut the yarn, begin the sweater, and you won’t have to break the yarn to work the sleeves and then rejoin it to work the body.

Capelet:
CO 23 sts.  K in 1x1 rib for 3 rows.
Place markers: k5, pm, k4, pm, k3, m1, k3, pm, k4, pm, k4.

Begin raglan increases:
Increase row: k2, *p to marker, yo, slip marker, p1, yo, rep from * to last 2 sts, k2.
Next row: K all sts.

Repeat the above two rows until you have 72 sts on the needles.

Next row: slip 11 sts onto a spare DPN or stitch holder. 
*Rejoin yarn and p 15, turn and k15, then work 3 rows of 1x1 ribbing and BO in rib.

Slip 20 sts onto spare DPN or stitch holder.  Repeat above step (from *) for second sleeve.

Rejoin all remaining sts onto one needle.  Continuing with unbroken yarn:
K2, p to 1 st before gap, p2tog, p to 1 st before next gap, p2tog, p to last 2 sts, k2.
K one row; p one row.
Work 3 rows of 1x1 ribbing and BO in rib.
Seam sleeves to underarm.  Weave in all ends.  Block if desired.
Place a button or pin to close the front of the capelet.

Wednesday, June 30, 2010

Knitting Pattern: February Pullip Sweater

This pattern has been TRIPLE checked for accuracy: I have made a green sweater, a blue/purple variegated sweater, and a brown sweater for a Dal with a needle one size smaller (for my wonderful Ravelry swap partner, Mimi).  It is very easy, provided you are an intermediate knitter with a familiarity working with crochet thread on size 1 needles.

One final note: if you are lazy (like me) or not a big fan of using dolly-sized buttons (let's face it: who likes jamming a tiny little button into a tiny little hole?) you are welcome to use another closure, like a hook and eyelet (metal, not "velcro") and sew on faux buttons if you want to. 


February Pullip Sweater
Based on the February Lady sweater, available human-sized at Flint Knits.
Lillian plays the part of "innocent schoolgirl" pretty convincingly.

Materials:
  • Size 1-US needles (one circular, two DPNs with point protectors, whatever works for you)
  • One ball (you will need far less than a full ball) of size 10 crochet cotton
    • Used for example: Aunt Lydia’s Classic Crochet Cotton (100% mercerized cotton, 350 yd/ball) in 484 Myrtle Green
  • Three very small buttons
  • Scissors & darning needle

You will need to know:
  • How to knit and purl
  • How to decrease: k2tog and ssk
  • How to yo
  • Basic familiarity with lace patterns: combining k2tog, ssk, and yo in the same rows (Note: working lace patterns, for me at least, requires an additional level of focus and concentration.  Try to work your lace patterns where you would be less distracted than usual, such as while your dear boyfriend watches a particularly boring game of golf on TV)
  • Garter stitch (knit every row)
  • The m1 increase
Gauge: 11 sts/per inch in stockinette stitch on size 1-US needles.  To ensure accurate sizing, be sure to check your gauge.
 
Note:
You will need to have a separate ball of yarn for working the sleeves and body, or two ends from the same ball.  Since I usually work from a ball of crochet thread, where only one end is available, I wind about 30 yards of thread onto a bobbin (the small Susan Bates kind, in my favorite color – purple) to hold aside for the sleeves.  Cut a separate length of yarn, begin the sweater, and you won’t have to break the yarn to work the sleeves and then rejoin it to work the body.


Gull lace pattern (see above site for source):
Row 1: (K1, k2tog, yo, k1, yo, ssk, k1) across row.
Rows 2 & 4: p all sts.
Row 3: (k2tog, yo, k3, yo, ssk) across row.


Sweater:
CO 24 sts.  K 3 rows.
Work increases according to the following chart.  The chart works like this, for row 1:
K4, (m1, k1, m1), k3, (m1, k1, m1), k6, (m1, k1, m1), k3, (m1, k1, m1), k4.  The number in the first row is the starting stitch count (not the number of stitches you will end up with).  Always k one row after working an increase row.

24 4 3 6 3 4 BH
32 5 5 8 5 5
40 6 7 10 7 6
48 7 9 12 9 7 BH
56 8 11 14 11 8
64 9 13 16 13 9
(Please pardon my quite rudimentary HTML skills.)

For rows ending with the letters BH:
After working the increase row, work a buttonhole row on the WS.  K2, yo, k2tog, k to end. 

After you get to 72 sts total, end after one more row (WS).

Next row: place 11 sts on holder, place 15 sts on spare DPN, place 20 sts on holder, place 15 sts on spare DPN, place 11 sts on holder.

Sleeves:
K2 rows. Only the last 14 sts are worked in pattern, so knit (or slip) every first stitch of every RS row and p every last st on every WS row.
Begin gull lace pattern.  Work until the sleeves are nearly desired length (for me, this was just past elbows, and four repeats of the four-row pattern).  Work 3 rows of garter st: k next RS row and two more rows, and BO, leaving at least a 12-inch tail to sew seams.

Resume body of sweater:
K all sts onto one needle.  Do NOT work two stitches together under each underarm.  If you are concerned about gaps under the arms, you may close any hole when seaming the sleeves, or you may pull one stitch through the other and work them in the wrong order (k one st on the other side of the gap, k st before gap).  Work buttonhole row next for these sts.
Work these sts in gull lace pattern as well, until the body is almost at the desired length.  K 3 rows in garter st again.  BO all sts.

Sew sleeve seams using tails of yarn left from binding off.  Weave in all ends.  Attach buttons opposite buttonholes.  Block.

Monday, January 25, 2010

Knitting Pattern: Pullip T-shirt

As promised (if a day late), here is the pattern of the week.


Pullip Raglan T-shirt
Revised 10/4/11

Materials:
  • Size 10 crochet thread.  Used for example:  J&P Coats Royale Crochet Thread (100% mercerized cotton, 350 yd/320m) in 493 French Rose.
  • Size 1-US needles, straight, circular, or a pair of DPN's
  • One long stitch holder, three safety pins, or two double-pointed needles (in addition to needles above)
  • 2 stitch markers
  • Scissors, ruler, darning needle
  • Yarn bobbin (not crucial)
You will need to know:
  • How to knit, purl, and work in both garter stitch and stockinette stitch
  • How to ssk, k2tog, and m1
Gauge: 11 sts/per inch in stockinette stitch on size 1-US needles.  To ensure accurate sizing, be sure to check your gauge.
    Note: wind about 5 yd of thread onto a bobbin for sleeves before beginning.

    CO 33 sts.
    K 2 rows.  P 1 row.

    Begin raglan increases.
    K according to chart below, working (m1, k1, m1) between each set of numbers:

    Click the image to view a larger version.

    I am going to include instructions for a baggier sweater as well (the second set up numbers, in parentheses).  This might fit Barbie; if you have a chance to try it, please let me know.

    Once you have 73(81) sts on the needles, p 1 row.

    Divide for sleeves: slip 11(13) sts onto holder, set 15(17) sts aside on a DPN or another holder, slip 21(23) sts onto holder, set aside 15(17) sts, slip 11(13) sts onto holder.

    Work sleeves: join yarn from bobbin to each set of 15(17) sts, k 1 row, p 1 row, k 2 rows, BO in k.

    Continue where you left off from the body sts: k10, k2tog, k19, k2tog, k10.  41 sts.*

    For a classic t-shirt shape (as shown), continue straight for the length desired, k 2 rows, and BO.

    For a shaped t-shirt, continue as follows:
    Set-up row (after row marked with *): p10, place marker, p21, place marker, p10.  Work 2 rows even.

    Row 1: K to marker, slip marker, ssk, k to 2 sts before marker, k2tog, slip marker, k to end.
    Row 2: P all sts.
    Row 3: K to 2 sts before marker, ssk, slip marker, k to next marker, slip marker, k2tog, k to end.
    Row 4: P all sts.

    Rep above 4 rows once more.  33 sts.

    K 1 row, p 1 row.  (Leave markers in place.)

    Begin increases for hips: *K to 1 st before marker, m1, k1, slip marker, k1, m1, rep from * once, k to end.
    P next row.

    Repeat this row until you have 45 sts (three repeats of the above two rows).  K 2 rows.  BO.  Sew sleeve seams.  Weave in all ends.  Sew snaps onto the back (or, be like me, and pin the shirt on so that you can quickly photograph it!).

    Monday, November 16, 2009

    Knitting Pattern: Pullip Bolero

     I can't take credit for designing this.  It's based on http://kellymaher.wordpress.com/2007/07/04/ribbed-lace-bolero/
    The nice thing about knitting for a doll is that you can make garments you wouldn't otherwise - I would never wear a bolero, or green, but my doll looks great in both.  You will also notice that she is wearing a white version of the strapless top with ribbons sewn on for straps.

    Note: it may be easier to put the sweater on if you remove her hands first (if possible).  Another option is to wrap them in a little bit of plastic wrap.


    Pullip Ribbed Lace Bolero
    You will need:
    • Size 000 needles
    • Size 0 needles
    • Size 20 cotton crochet thread
    • Sewing needle
    • Scissors & ruler
    You will need to know:
    • 1x1 ribbing
    • Cast on & bind off
    • Lace pattern stitch (below)
    • K2tog
    Lace Pattern - Lace Mesh st (multiple of 2 sts + 4 rows)
    Row 1: K1, *yo, k2tog, rep from * to last st, k1.
    Row 2: P all sts.
    Row 3: K2, *yo, k2tog, rep from * to end.
    Row 4: P all sts.

    Sweater:
    CO 42 sts with size 000 needles.  Work 6 rows in 2x2 rib (k2, p2 rib).
    Using 000 needles, work 1 row of Lace Mesh st.

    Change to size 0 needles.  Work rows 2-4 of Lace Mesh st, then rep pattern for about 1.25".  End after an odd row (I ended after a row 1).

    Change to size 000 needles.  P 1 row.
    Work 6 rows in 2x2 rib.  BO all sts.

    Sew the ribbing together at the sides, then reinforce by sewing down again and even knotting.  A shoddy job will take its toll the first time you put the bolero on the doll!  (I found out the hard way.)  Do not sew the lace together.  The holes left by the seams are the armholes.

    Thursday, October 29, 2009

    Introductory Post? Pssh...

    .. I prefer to get straight down to business.

    So without further ado, I present my first pattern, a fitted strapless top for Pullip dolls.


    Strapless Top
    You will need:
    • Size 1 US needles.  I suggest using a circular needle or two DPN's with point protectors.
    • 2 small snaps or hook-and-eye closures.
    • Size 10 crochet cotton.  You will very likely need less than a tenth of a 50g ball.  You could also use lace-weight wool yarn.
      • Used for example: Aunt Lydia's Classic crochet cotton in Purple.
    • Needle and sewing thread in a color matching that of the crochet thread.
    • Scissors & ruler

    You will need to know:
    • Stockinette stitch
    • Cast on & bind off
    • 1x1 ribbing (K1, P1 ribbing)
    • Make one, abbreviated m1
    • Slip-slip-knit, abbreviated ssk
    • Knit 2 together, abbreviated k2tog
    Gauge: 11 sts/per inch in stockinette stitch on size 1-US needles.  To ensure accurate sizing, be sure to check your gauge.

    Note: slip the first stitch of every row purlwise (pwise) for a neater edge.

    Instructions:
    CO 45 sts with size 1 needles.  Work 3 rows in 1x1 ribbing.
    Setup row: p11, pm, p22, pm, p12.  You are now ready to begin decreases.

    Shape for ribcage:
    Decrease row 1: k to 2 sts before marker, ssk, slip marker, k all sts between markers, slip marker, k2tog, k to end.
    Next row: p all sts.
    Decrease row 2: k to marker, slip marker, ssk, k to 2 sts before marker, k2tog, slip marker, k to end.
    Next row: p all sts.

    Work as above, decreasing 2 stitches every other row, until you have 31 sts on the needles (this will be after a decrease row 1). P the next row as set.

    Shape for waist:
    K 1 row, p 1 row.


    Shape for hips:
    Inc row: *k to 1 st before marker, m1, k1, slip marker, k1, m1, repeat from * to end.
    Next row: P all sts.

    Repeat last 2 rows twice more.  You will end with 43 sts.

    Work 3 rows in 1x1 rib.  BO all sts.

    Block (wet method or pin-and-spritz) to keep flat.  DO NOT OVERSTRETCH the top when you block it, or it will not fit Pullip properly!  Sew snaps to the back of the top; I sewed mine at the top and about halfway down so that the bottom edge of the top can "open" to accommodate the top of pants or a skirt.

    Note: for a dress, you could keep going instead of working the ribbing at the bottom until you have 55 or 59 sts.  Then knit straight for the length desired.