
Hello to all:
I am going to take a brief (2-3 month hiatus) from blogging. I have had a very productive year, have acquired two Blythe dolls, and have been so full of inspiration for doll sweaters, so I hope you won't mind. I am doing a 100% handmade Christmas this year, so I am going to dedicate the next month to working on gifts for my family - then I am moving across the state and doubt I will be back in full commission before the middle of January. I fully plan on returning to posting patterns in the spring, and my Flickr should be relatively active over the next few weeks. (This will not affect the giveaway; those items will still be mailed out on the first of December - you still have 11 days to enter!)
Thank you for your patience. Hope to see you all soon!
Edited to add: in case you didn't think I was serious, here is a holiday calendar of all the items on my list to make. (You will need Adobe Acrobat Reader to open the file.)
If you ever plan on doing a 100% handmade holiday, I would highly recommend this approach as it has taken my nebulous, overwhelming disorganization into an undertaking I think I can actually finish! Just make a list of the people for whom you want to make something, then break it down: 4 hats, 5 pairs of gloves, dish cloths, whatever. Then figure out about how long it will take you to do each item; for me, a dish cloth takes about an hour; a fingerless glove takes about 2. Lastly, create a calender and divide up your projects: I suggest divvying up the most difficult/ambitious projects first, then interspersing the rest of the projects within those days. I had to take into consideration the fact that my fingers hurt when I crochet too much, so I can only do one pot holder per day. I know which days I have more time to knit (Saturdays and Sundays) so I planned more work on those days. I also gave myself extra time at the end for finishing, as I am NOTORIOUS for not sewing seams and then staying up til 4 AM on Christmas Eve, never finishing the project, and having a really stressed out Christmas. You will notice that I did not plan anything at all on Christmas Eve - that's because I wrap presents in the morning, and by that point, the stress will be too much to be worthwhile.
Then comes the challenge of keeping yourself on task. I haven't gotten off-task yet, but I would say, do your very best to do what you planned on THAT DAY. If you get behind, don't let everything get off. For example, if I don't finish my scarf today, I will put it aside and move on to tomorrow's projects, then when I have extra time I will go back and finish. I have also added a couple of extra projects in there for "just in case" situation, in case I forget someone. My "extras" this year are two cotton-blend, tan scarves made from clearance yarn.
If anyone has any ideas for holiday packaging that fits in with the "homemade" theme (that is: no bright colors, no flashy wrapping paper, no boxes [if possible], NO PLASTIC), I would love to hear them in the comments. I'm a big fan of tissue paper, yarn "ribbon," and recycled paper bags. I also would like packaging items in handmade bags - if I have any extra time on my finishing days, I might whip up a dozen or so simple, calico drawstring bags (if I do, I'll share the pattern).
Saturday, November 19, 2011
Saturday, November 12, 2011
Pullip Shalom Cardigan
Based on Meghan McFarlane's beautiful human-sized cardigan, Shalom, this soft, elegant little number will wrap your girls in cozy. I will admit that it looks really weird off the doll, since it has flared sleeves (just like the original). However, when the piece is put on your doll, the bust will pull in, fit right, and look quite nice. Normally, I like to knit my demo sweater in the same color as the human version, but in this case, it's very hard to find crochet thread in any but the lightest grays!
This sweater is knit, like the original, in one piece, from the top down. When you come to the sleeves, you'll just bind off twice in the middle of the row, and on the row right after that, you'll work the two stitches on either side of this gap together to create cap sleeves. It makes sense, trust me - just follow the directions exactly as written. The benefit to this is that you will have NO seams and TWO ends to weave in (provided you only use one color). How awesome is that!?
*Disclaimer: this pattern has not yet been checked for accuracy, and I wrote up the pattern from sparse notes. I am going to try to knit one as soon as possible, but I decided to post anyway. If you decide to try it, and run into any issues, please email me and I will try to fix them.

Materials:
*Disclaimer: this pattern has not yet been checked for accuracy, and I wrote up the pattern from sparse notes. I am going to try to knit one as soon as possible, but I decided to post anyway. If you decide to try it, and run into any issues, please email me and I will try to fix them.

Materials:
- Size 1-US needles (for knitting flat)
- One ball of size 10 bamboo crochet thread
- Used for example: Aunt Lydia’s Bamboo (100% bamboo, 300 yd/ball) in 0810 Still Pool
- Use of substitute yarns will not result in the beautiful drape that this bamboo thread offers, though you are welcome to try (please let me know what results you obtain!)
- One small button (I used ¼” buttons)
- Scissors & darning needle
- How to knit and purl (and how to combine them into K2 P2 rib)
- How to yo
- How to k1 and p1 tbl
- The m1p increase
Gauge: 11 sts/per inch in stockinette stitch on size 1-US needles. To ensure accurate sizing, be sure to check your gauge.
Cardigan:
Cardigan:
CO 29 stitches. K 2 rows.
On next row, k2, yo, k2tog, k to end.
Next row: k all sts.
Begin increases:
Row 1: k5, *(m1, k1), rep from * to last 4 sts, k4.
Row 2: k3, *(p1 tbl, k1), rep from * to last 3 sts, k3.
Row 3: k3, *(k1 tbl, p1), rep from * to last 3 sts, k3.
Rep rows 2 & 3 one more time.
K 1 row.
Next increase set:
Row 1: k3, *(k3, m1, k2, m1), rep from * until last 3 sts, k3.
Row 2: k3, *(p1 tbl, k1), rep from * to last 3 sts, k3.
Row 3: k3, *(k1 tbl, p1), rep from * to last 3 sts, k3.
Rep rows 2 & 3 one more time.
K 1 row.
Last increase set:
Row 1: k4, *(m1, k3), rep from * until last st, k1.
Row 2: k3, *(p1 tbl, k1), rep from * to last 3 sts, k3.
Row 3: k3, *(k1 tbl, p1), rep from * to last 3 sts, k3.
Rep rows 2 & 3 one more time.
K 1 row.
Create sleeves:
K 9 sts, BO 24 sts, k 17 sts, BO 24 sts, k 9 sts.
Next row - joining the body together - k3, p to 1 st before gap, p2tog, p to 1 st before gap, p2tog, p to last 3 sts, k3.
Continue in stockinette stitch, keeping 3 border sts in garter st as established (this just means for every WS row, k first and last 3 sts), for the length you want the sweater to be. Mine was around 4.5 cm (I think, the original is now in Taiwan).
K 3 rows, starting the first of these 3 rows on a row you'd normally purl.
BO in knit.
I didn't block mine and it turned out fine; if you aren't happy with the consistency of your tension, gently wet-block. Sew on the button and you're done - seriously.
Saturday, October 29, 2011
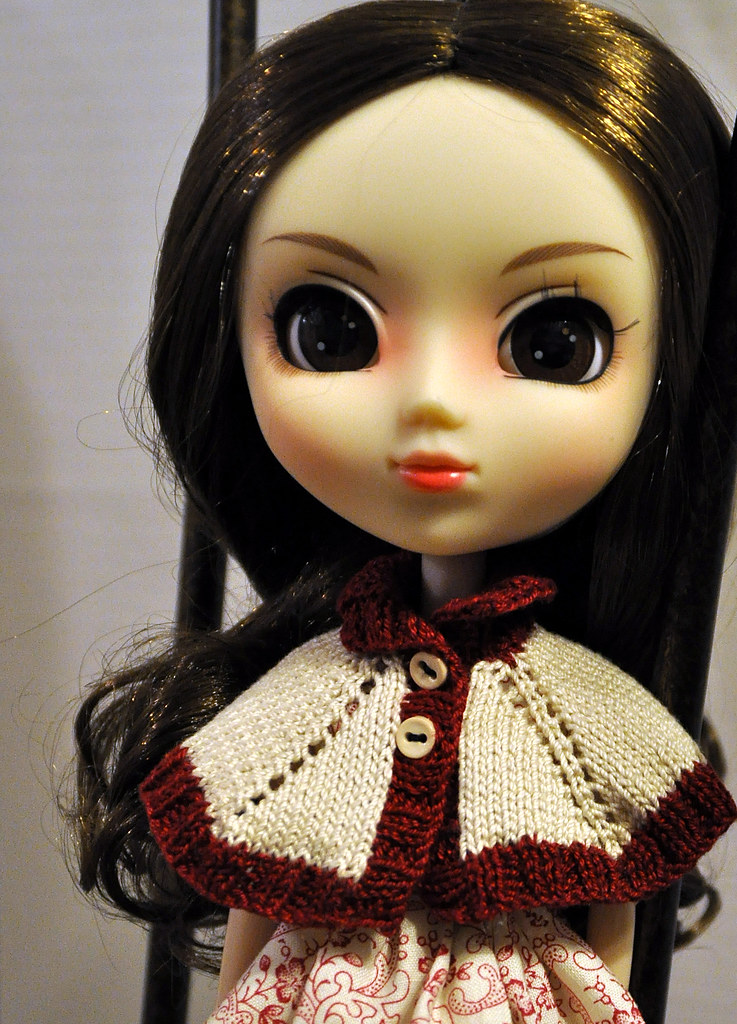
Knitting Pattern: Classy Collared Capelet for Pullip & Blythe
Based off of a Bernat pattern I found, this wrap makes the perfect fall cover-up for a coordinating dress. You can choose, like I did, to use a contrasting color for the collar and trim, or you can go with a solid like the original, human version. Either way, it’s a very simple piece with minimal finishing (if you hate sewing tiny seams as much as I do, you’ll love that there are none) and a lovely yarn over increase detail. The unmodified pattern will fill Pullip and Blythe; I think it will fit a Barbie if you go up a needle size.
Classy Collared Capelet for Pullip
Materials:
- Size 1-US needles (for knitting flat)
- One ball MC (you will need far less than a full ball) of size 10 crochet cotton
- Used for example: Aunt Lydia’s Classic Crochet Cotton (100% mercerized cotton, 350 yd/ball) in 419 Ecru (MC) and 492 Burgundy (CC)
- Four stitch markers
- Two small buttons (I used ¼” buttons)
- Scissors & darning needle
You will need to know:
- How to knit and purl (and how to combine them into K2 P2 rib)
- How to yo
- How to pick up stitches along a cast-on edge and a side edge
- The m1p increase
- How to bind off in rib
Gauge: 11 sts/per inch in stockinette stitch on size 1-US needles. To ensure accurate sizing, be sure to check your gauge.
Capelet:
With MC, CO 28 sts. P1 row.
Capelet:
With MC, CO 28 sts. P1 row.
SETUP ROW: k2, yo, PM, k1, yo, k5, yo, PM, k1, yo, k10, yo, PM, k1, yo, k5, yo, PM, k1, yo, k2. P the next row.
Work this row until you have 108 stitches (10 repeats):
*K to marker, yo, slip marker, k1, yo, rep from * to last marker, yo, k to end. P all WS rows.
When you have 108 stitches on the needle (or if you are changing the length of the capelet, when it has reached the length you want), change to CC and k 1 row.
Next row (WS): P3, (k2, p2) to last st, p1.
Next row (RS): k3, (p2, k2) to last st, k1.
Repeat these two rows one more time for a total of 4 rows of ribbing in CC.
Next row (RS): k3, (p2, k2) to last st, k1.
Repeat these two rows one more time for a total of 4 rows of ribbing in CC.
Collar:
With RS facing, pick up and knit one stitch for every CO stitch, for a total of 28 sts on the needles.
Increase row: (p4, m1p) to last 4 sts, p4.
Increase row: (p4, m1p) to last 4 sts, p4.
Work in k2, p2 rib for about ¾ of an inch or so, or until the collar is the length you want it to be. I wanted mine to stop at the shoulder joint, so I worked 11 rows. It does not matter if you end on a RS or WS row, as long as it looks right to you. BO loosely in rib.
Button Bands:
Note: if you changed the length of your capelet or collar, you will need to adjust these numbers as well. Just pick up 3 stitches to every 4 rows and try to finagle it into being a multiple of 2.
LEFT FRONT: with RS facing, pick up and knit 32 stitches along the left front edge. Work 4 rows in 2x2 rib and BO loosely. Mark where you want the two buttons to be (no need to get fancy here).
RIGHT FRONT: with RS facing, pick up and knit 32 stitches along the right front edge. Work 1 row of 2x2 rib. Work a row of 2x2 rib and when you come to the buttons, yo, k2tog to make buttonholes, working the rest of the row in pattern. Work 2 more rows of 2x2 ribbing and BO loosely.
Weave in all ends, block, and attach buttons where marked.
Saturday, October 22, 2011
Knitting Pattern: Stitch & Bitch "That Seventies Poncho" sized for Pullips & Blythe
Inspired by “That Seventies Poncho” from Stitch ‘N Bitch Nation, by Debbie Stoller, this retrofabulous accessory will make your Fruit Punch and Pow Wow Poncho girls totally jealous! Just a warning, though – while doll clothes are generally pretty quick to knit, by the time you get to the bottom of this one, it can be a bit exhausting (you might have around 160 stitches on the needles if you follow this pattern verbatim). Luckily, though, it’s STILL only a doll poncho, so it goes quicker than a human version, for sure – and the results are totally worth it. Try it in these fruity brights, or maybe greens-aquas-yellows-and-whites; or pinks-and-purples, for a super-girly look.
Pullip That Seventies Poncho
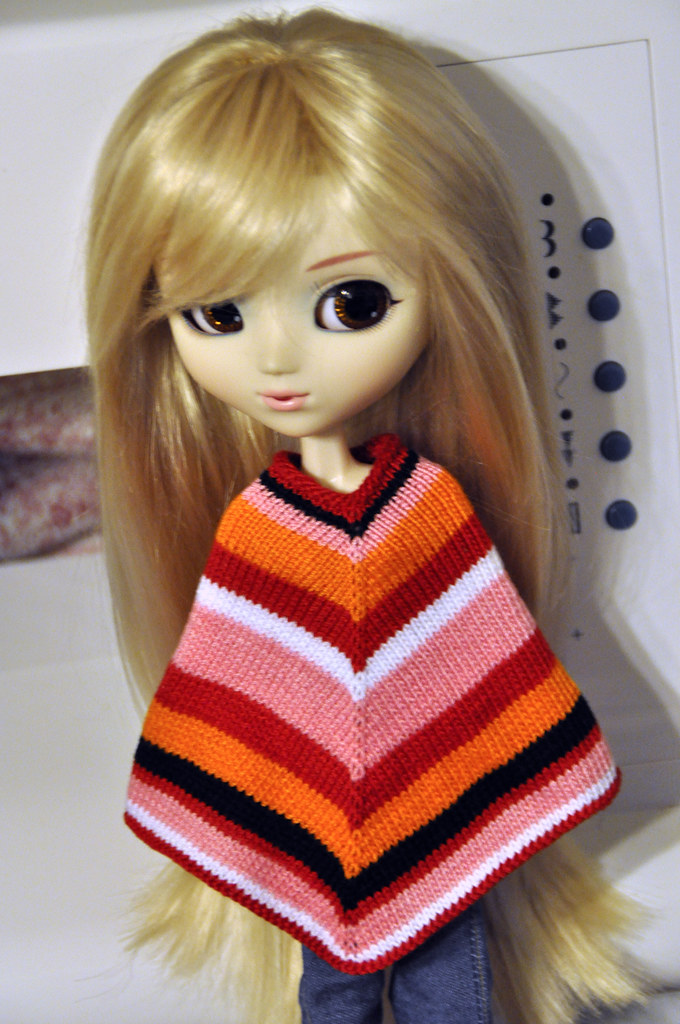 |
| Funky color scheme optional. Eve gave me no choice! |
Materials:
- Size 1-US needles (for knitting flat)
- One ball (you will need far less than a full ball) of size 10 crochet cotton in your choice of colors. Even a solid-colored poncho will not require a full ball.
- Used for example: Aunt Lydia’s Classic Crochet Cotton (100% mercerized cotton, 350 yd/ball) in:
- 901 Pagoda Red
- 012 Black
- 493 French Rose
- 431 Pumpkin
- 001 White
- Small snap, hook and eye, hook and loop, or closure of your choice
- Scissors & darning needle
You will need to know:
- How to knit and purl
- How to m1
Gauge: 11 sts/per inch in stockinette stitch on size 1-US needles. To ensure accurate sizing, be sure to check your gauge.
Poncho:
Poncho:
CO 35 sts. K2 rows.
Next row (RS): k1, m1, k16, m1, pm, k1, m1, k to last st, m1, k1.
P next and all subsequent WS rows.
Next and all subsequent RS rows: k1, m1, k to marker, m1, slip marker, k1, m1, k to last st, m1, k1.
Repeat as established (working increase row every RS row and p all WS rows) until you have reached the length you want for your poncho.
The color pattern I used for my poncho, approximating the Stitch & Bitch version, is as follows:
4 rows red (including the first 2 knit rows), 2 rows black, 4 rows pink, 8 rows orange, 6 rows red, 4 rows white, 10 rows pink, 6 rows red, 6 rows orange, 4 rows black, 2 rows red, 4 rows pink, 2 rows white, 1 row red, and then BO in red.
Block. Using mattress stitch, close back seam about ¾ of the way up. Close the top with a hook and eye or snap.
I did not do a drawstring on my poncho. If you wanted to, add some evenly spaced eyelets (yo, k2tog) around row 3 and weave in a length of crochet chain stitch or braided thread. Also, in the original pattern, there are occasional rows of garter stitch; all you have to do to accomplish this is to knit the occasional WS row.
Subscribe to:
Posts (Atom)
